| 일 | 월 | 화 | 수 | 목 | 금 | 토 |
|---|---|---|---|---|---|---|
| 1 | 2 | 3 | 4 | 5 | ||
| 6 | 7 | 8 | 9 | 10 | 11 | 12 |
| 13 | 14 | 15 | 16 | 17 | 18 | 19 |
| 20 | 21 | 22 | 23 | 24 | 25 | 26 |
| 27 | 28 | 29 | 30 | 31 |
- 초소형머신러닝
- 임베디드 딥러닝
- 코테
- bfs문제
- 삼성역테
- 다이나믹프로그래밍
- 그리디
- 컴퓨팅사고
- TensorFlow Lite
- 포스코 교육
- 삼성코테
- tinyml
- 포스코 AI교육
- 알고리즘
- 딥러닝
- tflite
- 코딩테스트
- 삼성역량테스트
- dfs
- DP
- dfs문제
- 자료구조
- BFS
- 코테 문제
- sort
- 포스코 ai 교육
- DP문제
- 삼성코딩테스트
- 영상처리
- MCU 딥러닝
- Today
- Total
코딩뚠뚠
[머신러닝 공부] Tiny ML -6 / 어플리케이션 구축-2 본문
Chapter5. 어플리케이션 구축
"
이번 챕터에서는 모델을 실행하는 어플리케이션을 구축해 본다.
"

어플리케이션-1 포스팅에 이어 계속해서 어플리케이션을 구축한다.
- 테스트코드 작성 : 어플리케이션-1 포스팅에서 완료
- 프로젝트 파일의 구조 파악
- 소스코드 분석
이전 챕터에서는 어플리케이션을 구성하기 위한 전체적인 테스트코드를 작성해봤다.
이번엔 프로젝트 파일들로 구조를 파악해보고 소스코드의 구성을 파악해보자.
2. 프로젝트 파일의 구조 파악
GitHub - yunho0130/tensorflow-lite: O'Reilly <TinyML: 텐서플로우 라이트 Tensorflow Lite> 소스코드 저장소
O'Reilly <TinyML: 텐서플로우 라이트 Tensorflow Lite> 소스코드 저장소 - GitHub - yunho0130/tensorflow-lite: O'Reilly <TinyML: 텐서플로우 라이트 Tensorflow Lite> 소스코드 저장소
github.com
위 깃헙의 프로젝트 파일들과 코드들을 참조했다.
위 폴더에는 어떤 파일들이 포함되어있을까?
1. BUILD
- 기본 애플리케이션 바이너리로, 애플리케이션의 소스코드를 사용하여 빌드할 수 있는 항목들을 나열한다.
2. Makefile.inc
- 어플리케이션 내의 빌드 대상 정보가 포함된 Makefile이다.
3. constants.h, constants.cc
- 프로그램 동작에 필요한 상수를 포함하는 파일 쌍
4. hello_world_test.cc
- 모델을 사용해 추론을 실행하는 테스트 코드이다.
5. main.cc
- main 함수로 프로그램의 진입점이다.
6. main_functions.h, main_functions.cc
- 초기화를 위한 setup 함수와 머신의 동작 loop함수가 포함되어있는 파일 쌍이다. 프로그램이 시작될 때 main.cc에 의해 호출된다.
7. output_handler.h, output_handler.cc
- 추론 실행 시마다 출력을 표시하는 함수를 정의하는 파일 쌍이다.
3. 소스코드 분석
1. main_functions.cc
setup()과 loop()를 정의한다. 프로그램의 핵심논리가 포함되어있다.
GitHub - yunho0130/tensorflow-lite: O'Reilly <TinyML: 텐서플로우 라이트 Tensorflow Lite> 소스코드 저장소
O'Reilly <TinyML: 텐서플로우 라이트 Tensorflow Lite> 소스코드 저장소 - GitHub - yunho0130/tensorflow-lite: O'Reilly <TinyML: 텐서플로우 라이트 Tensorflow Lite> 소스코드 저장소
github.com
- 헤더 파일을 포함해준다.
#include "tensorflow/lite/micro/examples/hello_world/main_functions.h"
~~~
#include "tensorflow/lite/version.h"
- 전역 변수를 설정한다.
namespace {
tflite::ErrorReporter* error_reporter = nullptr;
const tflite::Model* model = nullptr;
tflite::MicroInterpreter* interpreter = nullptr;
TfLiteTensor* input = nullptr;
TfLiteTensor* output = nullptr;
int inference_count = 0;

// 입출력과 중간 계산과정에 사용할 메모리 영역을 생성해준다.
// 최적값을 찾으려면 시행착오가 필요하다.
constexpr int kTensorArenaSize = 2 * 1024;
uint8_t tensor_arena[kTensorArenaSize];
}  // namespace
namespace로 묶어줌으로써 다른 프로젝트 파일에서의 변수 사용을 막아준다.
- setup() 함수 작성
void setup() {
// 로깅 설정
static tflite::MicroErrorReporter micro_error_reporter;
error_reporter = µ_error_reporter;
// 모델을 사용가능한 데이터 구조에 mapping 한다.
model = tflite::GetModel(g_sine_model_data);
if (model->version() != TFLITE_SCHEMA_VERSION) {
TF_LITE_REPORT_ERROR(error_reporter,
"Model provided is schema version %d not equal "
"to supported version %d.",
model->version(), TFLITE_SCHEMA_VERSION);
return;
}
// 모든 Op 구현을 가져온다.(operation)
static tflite::ops::micro::AllOpsResolver resolver;
// 모델을 실행할 인터프리터를 빌드해준다.
static tflite::MicroInterpreter static_interpreter(
model, resolver, tensor_arena, kTensorArenaSize, error_reporter);
interpreter = &static_interpreter;
// 모델 텐서를 tensor_arena의 메모리에 할당한다.
TfLiteStatus allocate_status = interpreter->AllocateTensors();
if (allocate_status != kTfLiteOk) {
TF_LITE_REPORT_ERROR(error_reporter, "AllocateTensors() failed");
return;
}
// 모델의 입력과 출력에 대한 포인터를 획득한다.
input = interpreter->input(0);
output = interpreter->output(0);
// 추론 실행 카운트
inference_count = 0;
}setup을 함으로써 이제 인프라가 설정됐다.
- loop() 함수 작성
void loop() {
  // 모델에 전달할 값을 계산한다.
  // 현재 추론 count를 주기당 추론횟수와 비교
  // 모델이 학습된 지정 가능한 값 내에서 위치를 결정하고 값을 계산
  float position = static_cast<float>(inference_count) /
                   static_cast<float>(kInferencesPerCycle);
  float x_val = position * kXrange;

  // 계산한 x_val을 모델의 입력텐서에 넣기
  input->data.f[0] = x_val;

  // 추론 실행 후 오류 있으면 보고한다
  TfLiteStatus invoke_status = interpreter->Invoke();
  if (invoke_status != kTfLiteOk) {
    TF_LITE_REPORT_ERROR(error_reporter, "Invoke failed on x_val: %f\n",
                         static_cast<double>(x_val));
    return;
  }

  // 모델의 출력 텐서가 예상한 y값 읽기
  float y_val = output->data.f[0];

  // 결과를 출력한다.
  HandleOutput(error_reporter, x_val, y_val);

  // 추론 count를 증가시키고 최대값이라면 초기화한다.
  inference_count += 1;
  if (inference_count >= kInferencesPerCycle) inference_count = 0;
}
2. output_handler.cc
void HandleOutput(tflite::ErrorReporter* error_reporter, float x_value,
                  float y_value) {
  // Log the current X and Y values
  TF_LITE_REPORT_ERROR(error_reporter, "x_value: %f, y_value: %f\n",
                       static_cast<double>(x_value),
                       static_cast<double>(y_value));
}
ErrorReporter 인스턴스를 사용해서 x값과 y값을 기록한다.
이의 커스텀 버전으로 여러 플랫폼에서 출력을 만들어낼 수 있다.
3. main.cc
int main(int argc, char* argv[]) {
  setup();
  while (true) {
    loop();
  }
}
main() 함수가 존재하는 곳이다. 프로그램의 진입점 역할을 하게 된다.
setup 함수와 loop 함수를 포함한다.
4. 애플리케이션 실행해보기
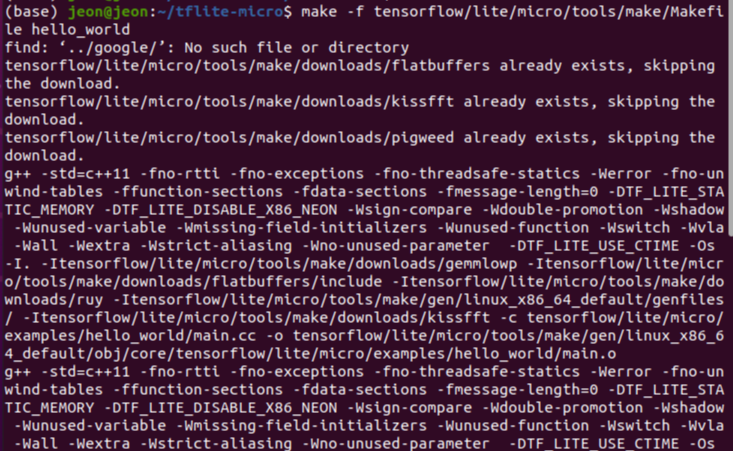
make 명령을 사용해서 빌드를 수행한다 -> 실행 가능한 바이너리를 생성하자
make -f tensorflow/lite/micro/tools/make/Makefile hello_world
이후 아래와 같은 명령으로 바이너리를 실행할 수 있다.
tensorflow/lite/micro/tools/make/gen/linux_x86_64/bin/hello_world
실행 시 output_handler.cc의 HandleOutput()에 의해 x와 계산된 y값에 대한 로그 출력이 쏟아져 나오는 것을 볼 수 있다.
이렇게 애플리케이션을 만들어 실행해봤다.
다음장부터는 이 프로그램을 마이크로컨트롤러에서 실행해보도록 한다.
'공부 > ML&DL' 카테고리의 다른 글
| [머신러닝 공부] Tiny ML -8 / 음성인식 어플리케이션-1 (0) | 2022.01.13 |
|---|---|
| [머신러닝 공부] Tiny ML -7 / MCU에 배포하기 (0) | 2022.01.08 |
| [머신러닝 공부] Tiny ML -5 / 어플리케이션 구축-1 (0) | 2021.12.08 |
| [머신러닝 공부] Tiny ML -4 / 모델 구축과 훈련 (0) | 2021.11.16 |
| [머신러닝 공부] Tiny ML -3 / 머신러닝 빠르게 훑어보기 (0) | 2021.11.01 |


